QuickBooks Cannot Create PDF File

How to Fix QuickBooks Cannot Create PDF File Issue?

Have you encountered the error in QuickBooks where the software could not save your form as a PDF file? Learn about QuickBooks cannot create pdf error in detail and how you can fix it!

What is the Error: QuickBooks could not save your form as a PDF file

While printing a report, invoicing, or creating an email, users may face this error where their QuickBooks flash the error of being unable to create the PDF file. For others, the error may come up when their Microsoft XPS Document Writer driver is outdated, causing the port PORTPROMPT to be incompatible with the latest version of QuickBooks software in use. 

QuickBooks Cannot Create PDF File

What factors cause to QuickBooks cannot Create PDF file Errors?

The main causes of this error may be:

  • When QuickBooks is unable to access the TEMP folder
  • The Windows 10 XPS Document Writer device that is updated is creating problems in the system
  • There is some fault in the XPS Document Writer

Solutions for QuickBooks Cannot Create PDF error?

Some fixes can help in solving this error. Follow the step-by-step instructions to solve this problem:

Method 1: Run the QuickBooks PDF and Print Repair Tool from the QuickBooks Tool Hub

Most times, running the QuickBooks PDF and print repair tool can help fix the PDF and printing errors you encounter on QuickBooks. You must have the QuickBooks tool hub on your system to be able to run the utility. You can download it from the official website of Intuit.

  • Open the QuickBooks tool hub on your system
  • Next, click on the Program Problems tab on the left side of the window
image 2
  • Locate and click on QuickBooks PDF & Print Repair Tool to run the utility
  • Wait and allow the tool to complete the scan and fixture. You must not close it manually 
  • Once the scanning process is complete, and the tool closes automatically, save the file as a PDF again to check if QuickBooks cannot create pdf file error is fixed

Method 2: Change the TEMP Folder Permissions

The information on configuring the QuickBooks PDF tool is contained in the TEMP folder. If this TEMP folder becomes inaccessible to QuickBooks, the PDF tool will not function. The user will require resetting the permissions of the folder so it can work again.

image 3
  • Close QuickBooks and open the Run window by pressing together the Windows key + R
  • In the Run window, enter %TEMP% and click OK
  • Within the TEMP folder, right-click in an empty space and then click on Properties
  • In the Security tab, check to ensure that every group and user name have Full Control else, set the permissions to Full Control, and then click on Save to make the changes
  • Click OK and exit this window
  • Go back to QuickBooks and try and save a PDF again to see if the issue has been fixed.

Method 3: Restore the Previous Drivers for the Microsoft XPS Document Writer – this solution is only for users who have recently updated to Windows 10

All systems that upgrade to Windows 10 add a new Microsoft XPS document writer device to its configuration and attach it to the default port “PORTPOMPT”. This action causes a conflict resulting in an error when the user tries to save QuickBooks Invoice as PDF.

The new Microsoft XPS document writer device should be deleted, and the drivers should be restored to the older version following the given steps.

  • Click on the Windows Key to open the Start menu and enter – Print Management in the search bar
  • Tap on entering and select the Print Management program that comes up on the top result
  • Click on Print Server on the left side of the Print Management window
  • Click on the name of your computer and select the last option which is – Printers
  • Click on Microsoft XPS Document Writer on the right side and click on the X mark on the toolbar
  • Next, right-click anywhere in the empty space and click on Add Printer
  • Now, Click Next on the Network Printer Installation Wizard and select Create a New Port – this option let you add a new printer to the system
  • From the Available Port Types drop-down menu, you must select Local Port and then enter XPS under the Port Name
  • Next, click on OK, and on the Install, the Printer Driver Window, select the Have Disk button
  • Insert the Windows Installation Disk and browse, locate and select the driver’s .inf file.
  • Under the name of the printer, type Microsoft XPS Document Writer and then click on Next to complete 
  • Reboot your system and the changes will be effective 
  • Open QuickBooks and then create a PDF to check if the error is rectified

Method 4: Remove the Logo from the Invoice Template

At times, the .jpg format of the company logo on a given invoice may interfere with the PDF tool. The solution is either to delete the logo from the invoice or to replace it with a .bmp file.

image 3
  • In QuickBooks, click on the Gear icon present on the toolbar
  • Next, click on Custom Form Styles under the Company menu
  • Locate the template in which you need to make the changes
  • In the Action column and click on Edit
  • Next, go to the Design tab and click on Make Logo Edits
  • Select Hide logo and then click on Done

Method 5: Alternate Way to Save the PDFs

You can try an alternate way to save the forms or invoice. Follow the instructions given below:

  • In QuickBooks, open the invoice that you need to save as a PDF
  • Next, click on the File menu and click on Print Invoice instead of Save as PDF
  • Select the Printer name as Microsoft Print to PDF
  • Check if the problem is with the XPS Document Writer
  • If the problem is with the Microsoft XPS Document Writer, you need to get in touch with experts externally. 

Follow the instructions here to check if you can save the file using the XPS Document Writer:

  • Close QuickBooks and open Notepad
  • Randomly type any text and click on File
  • Click on Print and select the XPS Document Writer
  • Next, click on Print and enter a name for the file
  • Save the file on the desktop and launch it from the desktop to verify if the file is correct
  • If the file opens, then the Microsoft XPS Document Writer is fine, but if it doesn’t, then there is a problem with it.

Contact QuickBooks Error Support

If you are still unable to fix QuickBooks cannot create pdf file error, our experts can help you solve the problem. Get in touch with us on our QuickBooks error support at +1888-727-4587 to learn more about our services.

how to send an accountant's copy of quickbooks

How to Send an Accountant’s Copy of QuickBooks
 Quick Guide on How to Create & Send QuickBooks Accountant’s Copy

QuickBooks is an extremely popular accounting software used globally by businesses of every scale and size. It offers a plethora of features, one of which is QuickBooks Accountant Copy. As the name suggests, it helps you collaborate with your account on QuickBooks Desktop. In this article, learn how to send an accountant’s copy of QuickBooks company file.

how to create & send accountant's copy of QuickBooks

With an Accountant’s Copy, you will be able to send your company file to your accountant without stopping your work. You will be able to import the changes made by your accountant and merge them with your changes easily.

How to Send an Accountant’s Copy of QuickBooks (Step by Step Guide)

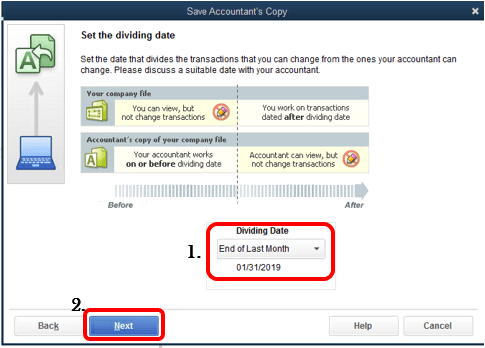
Before proceeding with the tutorial, you need to decide on a dividing date. Once you have created the Accountant’s copy, you will be able to enter transactions for dates only after the dividing date. Once you have checked the company file and decided a dividing data, follow the below-given procedure.

IMPORTANT: If you are using the QuickBooks Desktop Enterprise version, you need to turn off Advanced Inventory features before proceeding. You can turn them on after sending the Accountant’s copy.

  1. In QuickBooks, go to File and chose to Send Company File.
  2. Click Accountants Copy and chose Client Activities.
  3. Click Save File and select Next.
  4. Select Accountant’s Copy and click Next.
  5. Enter the desired dividing data and click Next.

You will now have an Accountant’s copy in a .qbx file format. And you are equipped with the knowledge of how to send an accountant’s copy of QuickBooks.

how to send an accountant's copy of quickbooks

You can give it to your accountant on a USB flash drive or via a cloud-sharing service. 

Use QuickBook’s built-in feature to Send an Accountant’s Copy

Follow these steps to use the built-in feature to send an accountant’s copy of the QuickBooks company file:

  1. Follow the above-given steps 1 and 2. Then, click ‘Send to Accountant’ and hit ‘Next’.
  2. Type the dividing data and click ‘Next.
  3. Enter the email address of your accountant.
  4. Create a password for the file (share this with your accountant).
  5. Click ‘Send’.

NOTE: If you had turned off the Advanced Inventory feature, you can now turn it on again.

‘Unable to Create Accountant’s Copy’ QuickBooks Error

Sometimes, while creating an accountant’s copy, you might get a QuickBooks error that does not let you do so. It might happen if your QuickBooks is not updated or if the Company file is damaged.

The error can also come up due to firewall blocking, slow internet connection, or server error. It can also occur if you use the File Transfer service in QuickBook to send the Accountant’s Copy.

How to Fix Unable to Create Accountant’s Copy Error

First, ensure you are using the latest version of the QuickBooks Desktop app.

To do this, open QuickBooks and go to Help. Choose Update QuickBooks Desktop. Then click on ‘Get Updates’. Once the update has been downloaded and installed, restart QuickBooks.

Make sure the company file does not have any special characters in its name.

If there’s a special character in the file name of your QuickBooks company file, you can simply right-click on it to rename it. Sometimes, removing special characters can help resolve the error.

If the company file size is larger than 200 MB, you might face encounter this error when sending it via the File Transfer service.

You can alternatively upload the .qbx or .qby file to a cloud storage service like OneDrive or Google Drive and share it with your accountant.

The company file is corrupted or damaged.

You may be unable to create an Accountant’s Copy if your company file is damaged. You can easily fix this problem with the QuickBooks file doctor tool. The tool can resolve various errors related to network and company files. This tool can be downloaded from the Intuit website or the QuickBooks Tool hub. If you still can’t make an Accountant’s Copy file, move on to the next solution.

You might not have security permissions.

Locate the QuickBooks company file and right-click on it. Choose the ‘Sharing and Security option and click on ‘Permission’. Now choose the ‘Add/Browse’ option and find the current user through which you are accessing the file.

Give all the read and write permissions to the user and then try creating an Accountant’s Copy again.

Conclusion – Contact QuickBooks Desktop Accounting Experts

If you are unable to create an Accountant’s Copy in QuickBooks due to this error, you should try reinstalling your QuickBooks Desktop. You can also take help from your accountant or get in touch with the QuickBooks desktop support team at +1888-727-4587.