How to Reconcile bank account statements & credit card transactions in QuickBooks?
Table of Contents
- 1 How to Reconcile bank account statements & credit card transactions in QuickBooks?
- 2 What is a Reconciliation in QuickBooks?
- 3 Benefits of Reconciliation
- 3.1 Prepping up for the reconciliation process on QuickBooks desktop:
- 3.2 Reconcile a bank account statements in QuickBooks Desktop Easily
- 3.2.1 You are required to enter the following details to begin the reconciliation process on QuickBooks desktop:
- 3.2.2 Reconciling all Bank account & Credit transactions in QuickBooks Desktop Step by Step
- 3.2.3 On the reconcile screen you will have a lot of options to easily complete the reconciliation. The different buttons and tabs that you will be using are:
- 3.3 Hide transaction after the statement’s end date
- 3.4 Items you have marked clear
- 3.5 The Mark All/ Unmark All tab
- 3.6 Go To
- 3.7 Matched
- 3.8 Columns to Display
- 3.9 Modify
- 3.10 Leave
- 3.11 Reconcile Now
If you have been using QuickBooks for a long time then you would have come across the reconciliation of your bank account and credit card in QuickBooks a few times. It is important that bank accounts and credit cards are regularly reconciled on QuickBooks.
What is a Reconciliation in QuickBooks?
Reconciliation is the process of matching your company’s accounting records on QuickBooks with those on your bank account or credit card. It is intended to help you improve the accuracy of your transactions. For this reason, it is advised that you reconcile your QuickBooks records regularly with your bank account and credit card. The process of reconciliation takes place electronically where items you entered in QuickBooks are matched with the transactions in your account.
Benefits of Reconciliation
Reconciling your bank account and credit cards in QuickBooks has the following benefits:
Accuracy of records maintained in QuickBooks desktop
It helps keep your accounting up to date and identical to what your bank or credit card statements show. This gives you the chance of identifying errors that may have occurred either on your QuickBooks records or from your financial institution.
The ending balance in QuickBooks matches what you have in your bank account statements
Business owners would realize the importance of having the right balance reflect in QuickBooks because many transactions would rely on that balance. It gives you the opportunity to track the transactions and figure out when payments were made or received.
Reduces the risk of issuing payments when your company may not have adequate funds
Closely tied to the above point, many business owners may issue payments looking at their QuickBooks balance only to realize that they may not have adequate funds in the bank account. Reconciliation limits such problems.
Improves financial efficiency for your business
Reconciling your bank account and credit card in QuickBooks also gives you insight into bank fees and additional charges which you may otherwise overlook. It helps identify unwanted costs to the business and helps you reduce any of these charges or fees where possible. As a result, reconciliations can improve the financial efficiency of your business.
Prepping up for the reconciliation process on QuickBooks desktop:
- Back up your QuickBooks company file
- Set up the bank or credit card account in QuickBooks with the correct beginning balance
- Accurately enter all uncleared transactions for the statement period
- Keep a copy of the bank statement or credit card statement handy
Reconcile a bank account statements in QuickBooks Desktop Easily
- In your QuickBooks Desktop, click on ‘Settings’, then click on ‘Tools’
- Choose ‘Reconcile’
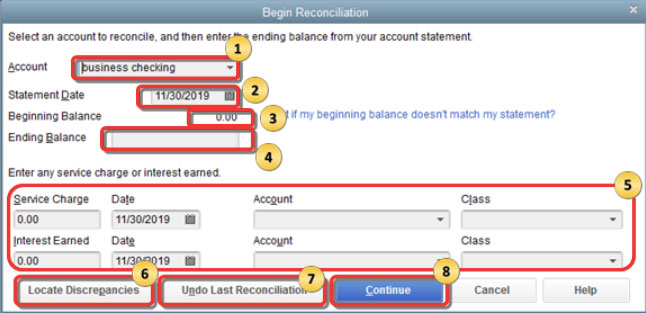
This will open the ‘Begin Reconciliation’ window on your screen. If you have a QuickBooks Merchant or Payments account and you are not signed in, then QuickBooks Desktop will automatically detect this and prompt you to Sign In. You must sign in to make sure that your account is linked to a valid company ID.
You are required to enter the following details to begin the reconciliation process on QuickBooks desktop:
- Choose the appropriate bank account or credit card from the drop-down menu
- You will find the statement date is auto-filled by the system. It can be changed according to your requirements. Usually, the date chosen automatically by the system is either 30 or 31 days from the statement date entered in the last reconciliation.
- The beginning balance will also be automatically filled by adding up all previously cleared transactions. This should be the same as the opening balance on your statement.
- The ending balance is blank. You must enter the amount mentioned in your statement for the ending balance.
- The service charge and interest section are to be used if you have not already entered these details as QuickBooks transactions already. If the statement shows a service charge that hasn’t been entered in QuickBooks yet then enter the amount along with the date of the charge and fill in the account and class appropriately. Similarly, if interest has been earned then enter the amount with the date on which interest was earned.
- The locate discrepancies button is used to check discrepancies in your statement and QuickBooks account.
- The Undo Last Reconciliation Button is used if you want to start all over again with the reconciliation process. This may mean you want to change the opening date or may undo the last reconciliation as part of the troubleshooting process where you are required to go back to the last reconciliation. By clicking on this button you will undo everything you did in the last transaction which means cleared transactions will become uncleared once again and your beginning balance will go back to the previous beginning balance.
- Once you have entered all the details in the Begin Reconciliation window then you can click on Continue to reach the Reconcile Window.
FIX QUICKBOOKS ERRORS USING QUICKBOOKS TOOL HUB
Reconciling all Bank account & Credit transactions in QuickBooks Desktop Step by Step
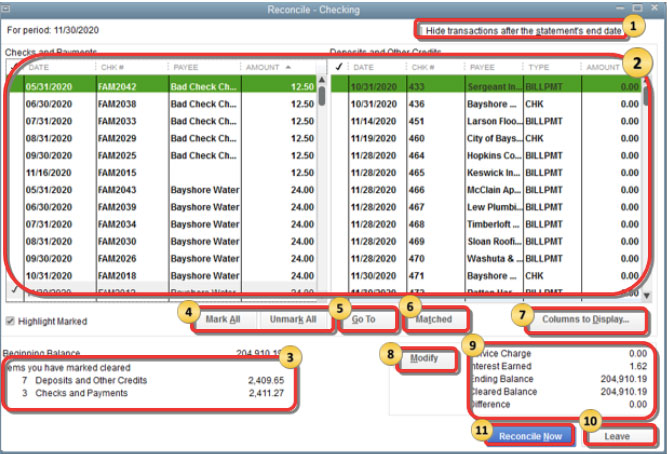
After clicking on Continue, you will reach the Reconcile screen which will show all the transactions on your QuickBooks account. You will find the Checks and Payments on the left side and the Deposits and Other Credits on the right side of the screen. To verify the transactions with those on your bank, you can select the transactions you would like to clear.
Towards the bottom of the page, you will find the ending and cleared balance which will eventually show if there is a difference. If the difference is 0 then your accounts are successfully reconciled. You can click on the Reconcile Account button to complete the reconciliation.
Hide transaction after the statement’s end date
Any transactions that do not fall inside the statement period you are working on can be hidden by checking this box on the top of the screen. It reduces confusion and helps you easily go through transactions.
All your transactions in QuickBooks will be reflected in either the Checks or Payments section or the Deposits and Other Credits section. If you are reconciling your credit card account then the Headers will show Charges and Cash Advances on one side and Payments and Credits on the other side.
One by one, go through the transactions to match them with your bank or credit card statement and check the transactions that match. Make sure that the amount for the transaction matches as well. When you begin selecting the transactions, the Cleared balance towards the end of the screen will keep changing.
The transactions can be sorted according to date and Amount by simply clicking on the date tab or amount tab once. Clicking the same a second time will sort the transactions in reverse order. Sorting makes it easier to spot transactions when you have lots of transactions to clear.
Items you have marked clear
Any transaction you check is marked clearly by the system and will reflect in the section ‘Items you have marked clear’. You will be able to see the number of items that have been cleared and the section it belongs to.
The Mark All/ Unmark All tab
If all the transactions match your statement then you can save time by using the Mark All button to check all the transactions in one go. This saves you time and helps you complete the reconciliation process quickly. All these items are now cleared. On the other hand, if you want to begin clearing the transactions all over again then you can click on the Unmark All tab and it will uncheck the checked transactions allowing you to start all over again.
Go To
If there is a small change in the transaction that you must edit in QuickBooks then use the Go To tab and you will be able to reach the transaction edit page directly from the reconciliation window. Save the changes and return to the reconciliation window to clear the transaction.
Matched
This button is helpful for business owners who are trying to reconcile an account that is set up for online banking on QuickBooks. The software intuitively checks the transactions and automatically matches and clears the transactions.
Columns to Display
All QuickBooks transactions will by default show the date, the CHK#, Payee, and Amount in separate columns. You can choose to hide all other columns except the amount column. Some users find it easier to clear transactions when they are looking at fewer columns.
Modify
If you would like to make changes to the information entered in the Begin Reconciliation Window then you can use this tab.
Towards the bottom right of the screen, you have all the crucial figures related to the reconciliation. While the service charge, the interest earned, and the ending balance are details obtained from the information you enter in the Begin Reconciliation Window, the Cleared Balance will keep changing as you clear more transactions. Lastly, this section will show the Difference which should be zero once you complete clearing all the transactions.
Leave
Use this tab to move away from the Reconcile screen and edit transactions before you can complete reconciling the account. When you visit the account registration page you will notice that items you have marked cleared on the reconcile window show an asterisk next to them. This means that they are still pending because you have not completed the reconciliation. QuickBooks will save your progress in the reconcile screen and when you want to return, simply enter the beginning balance in the Begin Reconciliation Window again to return to the reconcile screen.
Reconcile Now
Once you clear all the transactions, you can click on Reconcile Now. If the difference is zero, the reconciliation is successful and you will see a Reconciliation Report. If the difference does not come to zero then you will get the opportunity to return to the Reconcile Window, Leave Reconcile and review your transactions, or Enter Adjustment where you can enter the adjustment to complete the reconciliation.QuickBooks will automatically create a special account known as the ‘Reconciliation Discrepancies’ account which will reflect the adjustment.
If you are reconciling a credit card account then QuickBooks will prompt you to make a payment for the outstanding balance. You can click on cancel if you do not want to record a payment.
Connect with a QuickBooks Expert For Reconciliation
Get in touch with industry-specific QuickBooks experts for QuickBooks reconciliation support on the QuickBooks helpline at +1800-994-0980. We provide reconciliation services for free to our clients from various different formats. One-time personalized QuickBooks enterprise support and account reconciliation are free of charge for QuickBooks users.


