QuickBooks POS Multi-User Mode Setup (Step by Step Instructions)
Table of Contents
- 1 QuickBooks POS Multi-User Mode Setup (Step by Step Instructions)
- 2 Learn QuickBooks Point of Sale Multi-User Mode Setup in Simple Steps

Are you looking for step-by-step instructions to set up QuickBooks multi-user mode to access the point of sale company file? Here is how you can access the company file by multiple users in QuickBooks Point of Sale.
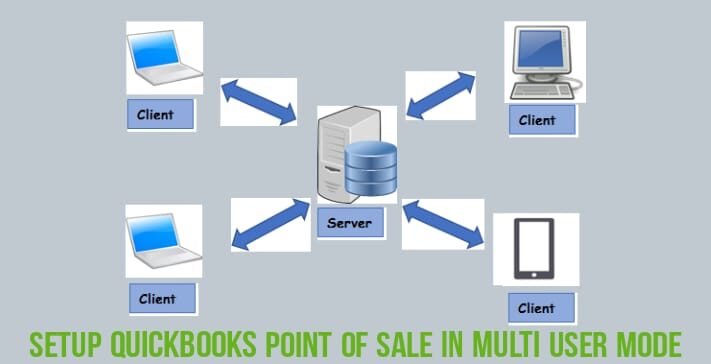
You have a client workstation and a server in multi-user mode set up.
Here the server is referred to as your computer, which works as the fastest workstation with Point of Sale installed in it and also meets the hardware and software requirements to work as the workstation computer.
This allows multiple users to access a point of sale company file up to 19 client workstations.
Before you set up QuickBooks point of sale in multi-user mode. Some of the works that can be done only by the server are mentioned below
- The server creates and holds the Point Of Sale company file.
- It has full access to back up, rename, and restore the company file.
- You can exchange information within the QuickBooks desktop only using the server.
- Using the server you can import data through the Data Import tool.
- The server allows you to set the item and customer ranking preferences.
- It allows multi-store access, for example, you can exchange information with other stores.
Additionally, client workstations can be any computer on your network that has QuickBooks POS installed in it, but it should not be a server. Generally, they are cash records that record daily transactions.
Learn QuickBooks Point of Sale Multi-User Mode Setup in Simple Steps
Before we begin with the steps for QuickBooks POS Multi-user setup, it is necessary to make note of the following points-
- Make sure your system meets the system requirements for Point Of Sale.
- Ensure that QuickBooks desktop point of Sale is installed in both the server and the client workstation.
- Make a note of the Store exchange overview.
Step 1 – To Set up folder permissions for QuickBooks POS Multi-User Mode
- Using the Windows File Explorer locate your company file on your server Workstation.
- You will find the company file by default in the following location – C: Users\Public\Public Documents\Intuit\QuickBooks Point of SaleXX\Data.
- Now, Right-click on the company folder and then select Properties.
- Now, select the Sharing tab and then select the Advanced sharing option in it.
- Finally, select Share this folder.
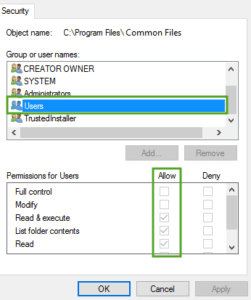
- Now you should select Permissions and then click on Add option. You should enter “QBPOSdbsrvuser” in the pop-up screen and then select OK. Then you should select QBPOSdbsrvuser and click on Full control.
- Note: Make sure you set the permission of everyone and services user group as Full Control.
- After selecting your preference, now select Apply and then click Ok to set up the folder permissions.
Step 2 – To configure the Windows Firewall for QuickBooks POS Multi-User Setup
Configure windows firewall to run your QuickBooks software in multi-user mode.
- Open the Run command by simultaneously pressing Windows+R on your keyboard.
- Now type Control in the command window and click on Ok.
- This will open the Control panel.
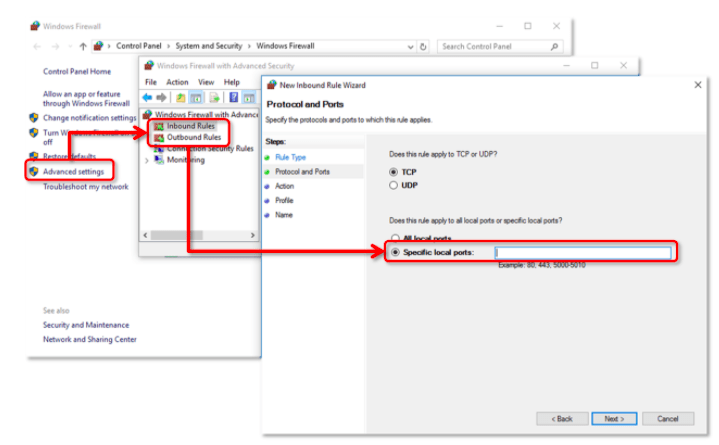
- Now you should set the “view by” options as Small Icons and then select Windows Firewall.
- Now click on Advanced settings and then choose Inbound.
- Click on New Rule and then select Port. Now click Next and enter the Port numbers and then select Next.
- Now select Allow connection and then click on Next.
- After that, you should name your firewall rule, for example, POS, and click the Finish button to complete the process.
- To create a new outbound rule follow the above steps from the New rule.
Port numbers for reference
- TCP (incoming) – 8040, 8024, 46228, 8443, 8036, 46225, 46216-46220, 8035, 46203, 2638, 443.
- UDP (outgoing) – 8036, 8024, 8035, 2638.
Step 3 – To Switch the server to Multi-user Mode in order to set up QuickBooks POS Multi-user
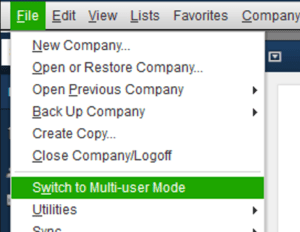
You should select the Switch company file to Multi-user Mode from the File menu.
Step 4 – To configure the Workstation number in QuickBooks POS Multi-user mode(optional)
Select Preferences from the File menu and then select Workstation and go to the General option. Now enter the workstation number in the field “Please enter the number of this workstation”. Finally, select Save.
Contact POS Experts for QuickBooks Point of Sale Multi-User Setup
In case you face difficulty setting up multi-user mode in QuickBooks Point of Sale. Connect with our QuickBooks Point of Sale support experts at +1800-994-0980 & get instant help.


