How to Backup QuickBooks Desktop Company Files (Windows & Mac)
Table of Contents
Not backing up your QuickBooks company files can lead to a disastrous loss of important data. It is always a good practice to create manual backups regularly. In case of errors, data loss, or a clean install, you can restore the QuickBooks backup files to get back the original data safely.
If you want to know how to restore and backup company files in QuickBooks, we have laid down a step-by-step guide below for Windows as well as Mac.
How to Create Backup of QuickBooks Company File (Pro, Premier & Enterprise)
Windows:
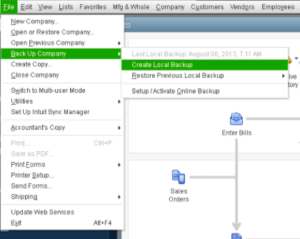
- In the File menu, click on ‘Back Up Company’.
- Choose the ‘Create Local Backup‘ option, which is mostly denoted by the radio button.
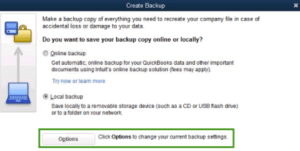
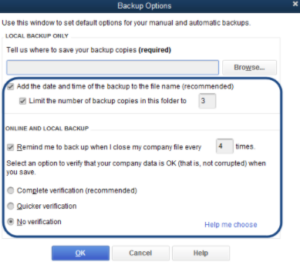
- Click on ‘ Local Backup’ and you can click on options to browse to the folder where you want to save the backup. You can save it on a local as well as an external drive.
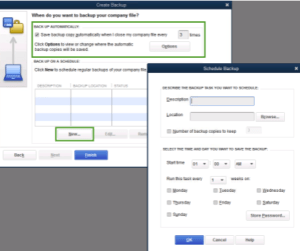
- You can choose to set up the time and date of the backup as well as the number of backups.
- You can also set backup reminders and verify the data before backup.
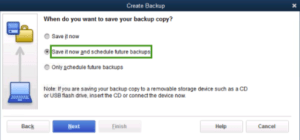
- Once you have set the preferences, you can click ‘Save it Now’ to perform the backup. You can also choose the ‘Now and Schedule future backups’ option for safety.
We recommend you schedule the backups at night after work hours so that it does not get interrupted.
For Mac:
For manual backups:
- Go to ‘File’ and click ‘Back Up’.
- Choose the folder where you want to save the backup files.
- Click on ‘Start Backup’.
For scheduling automatic backups:
- In QuickBooks, go to Preferences and click ‘Backup’.
- Choose whichever option suits your purpose.
You will get options to set up automatic backups every few hours or whenever they’re closed. You can also choose to overwrite the last backup to conserve storage space. There is also an option to encrypt the backup with a password of your choice for added security.
We recommend that you store a copy of the backup on a cloud service like iCloud, Dropbox, etc., along with another copy in a portable drive like flash drives or external hard drives.
If you’re using QuickBooks in a multi-user mode, backups need to be created from the QuickBooks Server. You can create backups only from the system that has the QuickBooks application and company file stored on it locally. In case of doubts, contact your IT support or the QuickBooks support team.
How to Restore a Company File Backup in QuickBooks
For Windows:
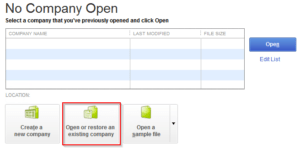
- Click on ‘File’ and choose ‘open/restore company’.
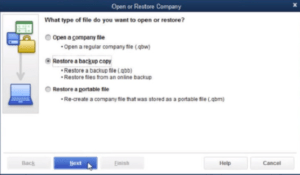
- Then click Restore a backup copy and click Next.
- Now choose the backup type – online or local and click Next.
- Select the backup file and click Open.
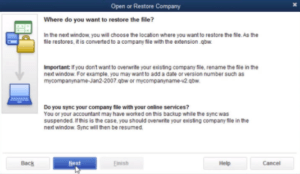
- You will be asked to select the restore location. Do that and click Next.
Tip: When restoring a backup, rename it so that it does not overwrite the existing files. This is helpful in case the backup has issues that you aren’t aware of. If you click on ‘Replace’, it will not rename the file, and the existing file will get erased.
Cannot Restore Backup in QuickBooks on Mac?
There is a common issue in Mac where users want to restore a backup, but the file itself is greyed out (cannot be selected). This is faced by many users and is a very simple problem that can be worked around pretty quickly.
Reason: When you’re trying to restore a backup, the file might be greyed out because it’s a .dmg file. You cannot restore a backup file directly from a .dmg container.
Fix Cannot Restore Backup in QuickBooks For Mac Error-
- Open the .dmg file by double-clicking it. The file will be mounted.
- Now open the mounted file and drag the company file from there to the Documents folder.
- Next, open QuickBooks, click File and select Open Company.
- Finally, locate the file that you have just saved in the Documents folder and click Open.
- Your backup will now be restored.
Contact QuickBooks Desktop Experts for QuickBooks Backup Queries & Support
If you have followed the above-mentioned steps correctly, you will have successfully backed up and restored your company file. In case you are facing any errors, try rebooting your system or reinstalling QuickBooks. In case nothing works, get help from the QuickBooks desktop support team and do not try to fix it yourself, or you might end up losing important data.

