How to Convert QuickBooks Accountant’s Copy to Regular Company File

How to Convert QuickBooks Accountant’s Copy to Regular Company File

How to Convert QuickBooks Accountant’s Copy to Regular Company File

If you have been using QuickBooks Desktop as the accounting software for your business, you might be aware of the feature that allows you to make a QuickBooks Accountant’s Copy of your company file. This copy allows you to remotely work with your accountant on the same file and then merge the changes later without overwriting any data.

However, there can be times when you have an Accountant’s Copy in .qbx or .qba format and you would want to use it as a regular company file format (.qbw). This way, you would be able to make changes without any restrictions.

How to Convert Accountant’s Copy (.QBX, .QBY, .QBA) to Company File (.QBW)

convert quickbooks accountant copy to company file
Know more about QuickBooks Accountant’s File

You can easily convert the file if you are using the QuickBooks Enterprise Accountant or Premier Accountant version of QuickBooks desktop. However, if you have made any changes to the original company file after the conversion, you will need to re-enter those changes.

To use a QuickBooks Accountant’s Copy file as a company file, you need to convert it first. Do note that you can only use the above-mentioned versions of QuickBooks Desktop for the conversion process. Other variants of the software do not support this feature. Also, once the file has been converted to a company file, you will not be able to create an Accountant’s Changes file.

If you are okay with this, carefully follow the steps given below.

Note: The process might be different for newer and older versions of QuickBooks. For your convenience, we have included both.

Converting Accountant’s Copy to Company File in QuickBooks Accountant 2015 & Above

This process will work on the 2015 or later versions of QuickBooks accounting software.

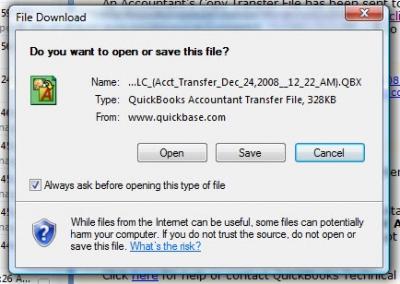
  1. Locate your Accountant’s Copy (.QBA or QBX format) and double-click to open it. Then, back up the file before proceeding to prevent data loss.
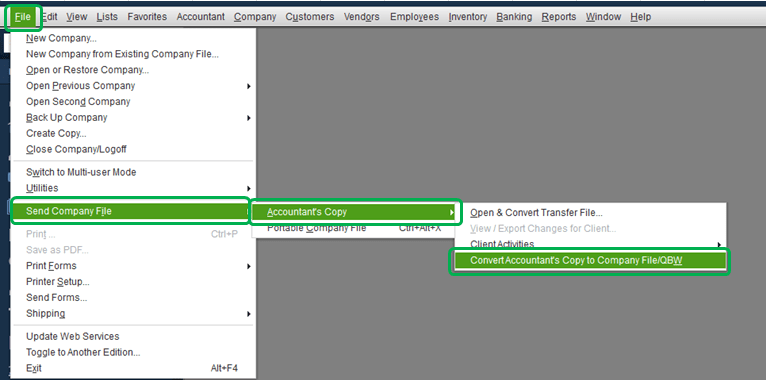
  2. Now go to the File menu and click Send Company File.
  3. Choose Accountant’s Copy and click on Convert Accountant’s Copy to Company File/QBW.
  4. Click OK and confirm the process. You will be asked to choose the location to save the file.
  5. Choose any folder and name the file as per your preferences. Click Save.
  6. Finally, click OK.
How to Convert QuickBooks Accountant’s Copy to Regular Company File

You will now have a new file that will work as a company file and you can make changes to it without any restrictions.

For QuickBooks Accountant 2014 & Below Desktop Versions

In case you are on an older version of the QuickBooks Account software. Follow this procedure to convert your QuickBooks accountant file.

  1. Open QuickBooks directly without opening any company file or accountant file.
  2. Then, click on the File menu and select Accountant’s Copy.
  3. Next, click on Convert Accountant’s Copy to Company File.
  4. This will open up a new window. Now locate the Accountant’s Copy file that you want to convert and click Open.
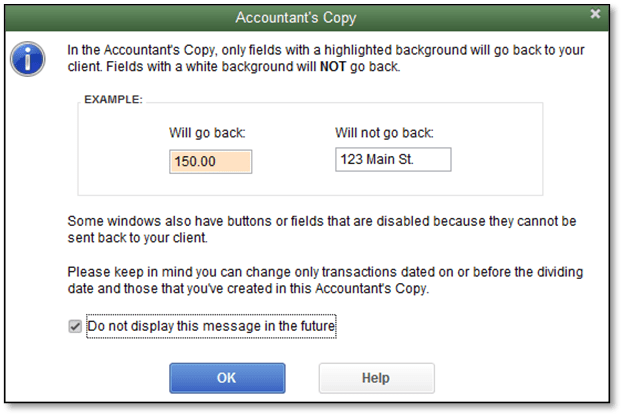
  5. You will get a dialogue box on the screen explaining the limitations of the process. If you are okay with it, hit OK.
  6. Select a location where you want to save the newly converted file and type a new name for the file. You need to make sure that you choose .QBW as the file extension under the ‘Save as type option.
  7. Click on Save and it will convert the file and notify you when it’s done.
  8. Click OK.

You should now have a .qbw file that you can use as a normal company file. 

How to Convert Accountant’s Copy to a Working File

If you are the accountant and have received the Accountant’s Copy file in a .qbx format, you need to convert it to a working file (.qby format) to work on it and make changes.

To get this working file, follow the below-given steps.

  1. Open QuickBooks and go to the  File menu.
  2. Click on Open and Restore Company.
  3. Then, select Convert an Accountant’s Copy Transfer File and choose Next.
  4. You will see an overview of the file. Go through it and click Next.
  5. Follow the same steps in the next window and click on Next.
  6. Locate the Accountant’s Copy file and hit Open.
  7. Confirm the conversion and type a name for the file.
  8. Click Save.

You will now have a working file (.qby) that you can make changes in.

Contact QuickBooks Desktop Support Experts for QuickBooks Accountant file Conversion

In case you are unable to achieve the results after reading this support article. Connect with QuickBooks 24/7 support experts on the toll-free helpline at +1888-727-4587.

how to send an accountant's copy of quickbooks

How to Send an Accountant’s Copy of QuickBooks

 Quick Guide on How to Create & Send QuickBooks Accountant’s Copy

QuickBooks is an extremely popular accounting software used globally by businesses of every scale and size. It offers a plethora of features, one of which is QuickBooks Accountant Copy. As the name suggests, it helps you collaborate with your account on QuickBooks Desktop. In this article, learn how to send an accountant’s copy of QuickBooks company file.

how to create & send accountant's copy of QuickBooks

With an Accountant’s Copy, you will be able to send your company file to your accountant without stopping your work. You will be able to import the changes made by your accountant and merge them with your changes easily.

How to Send an Accountant’s Copy of QuickBooks (Step by Step Guide)

Before proceeding with the tutorial, you need to decide on a dividing date. Once you have created the Accountant’s copy, you will be able to enter transactions for dates only after the dividing date. Once you have checked the company file and decided a dividing data, follow the below-given procedure.

IMPORTANT: If you are using the QuickBooks Desktop Enterprise version, you need to turn off Advanced Inventory features before proceeding. You can turn them on after sending the Accountant’s copy.

  1. In QuickBooks, go to File and chose to Send Company File.
  2. Click Accountants Copy and chose Client Activities.
  3. Click Save File and select Next.
  4. Select Accountant’s Copy and click Next.
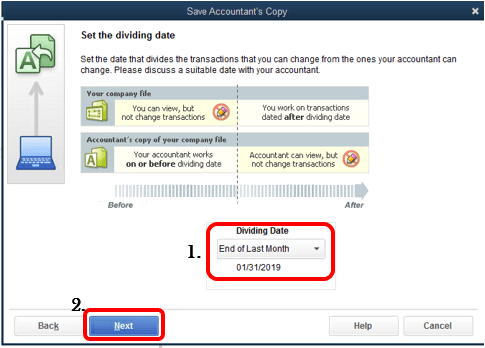
  5. Enter the desired dividing data and click Next.

You will now have an Accountant’s copy in a .qbx file format. And you are equipped with the knowledge of how to send an accountant’s copy of QuickBooks.

how to send an accountant's copy of quickbooks

You can give it to your accountant on a USB flash drive or via a cloud-sharing service. 

Use QuickBook’s built-in feature to Send an Accountant’s Copy

Follow these steps to use the built-in feature to send an accountant’s copy of the QuickBooks company file:

  1. Follow the above-given steps 1 and 2. Then, click ‘Send to Accountant’ and hit ‘Next’.
  2. Type the dividing data and click ‘Next.
  3. Enter the email address of your accountant.
  4. Create a password for the file (share this with your accountant).
  5. Click ‘Send’.

NOTE: If you had turned off the Advanced Inventory feature, you can now turn it on again.

‘Unable to Create Accountant’s Copy’ QuickBooks Error

Sometimes, while creating an accountant’s copy, you might get a QuickBooks error that does not let you do so. It might happen if your QuickBooks is not updated or if the Company file is damaged.

The error can also come up due to firewall blocking, slow internet connection, or server error. It can also occur if you use the File Transfer service in QuickBook to send the Accountant’s Copy.

How to Fix Unable to Create Accountant’s Copy Error

First, ensure you are using the latest version of the QuickBooks Desktop app.

To do this, open QuickBooks and go to Help. Choose Update QuickBooks Desktop. Then click on ‘Get Updates’. Once the update has been downloaded and installed, restart QuickBooks.

Make sure the company file does not have any special characters in its name.

If there’s a special character in the file name of your QuickBooks company file, you can simply right-click on it to rename it. Sometimes, removing special characters can help resolve the error.

If the company file size is larger than 200 MB, you might face encounter this error when sending it via the File Transfer service.

You can alternatively upload the .qbx or .qby file to a cloud storage service like OneDrive or Google Drive and share it with your accountant.

The company file is corrupted or damaged.

You may be unable to create an Accountant’s Copy if your company file is damaged. You can easily fix this problem with the QuickBooks file doctor tool. The tool can resolve various errors related to network and company files. This tool can be downloaded from the Intuit website or the QuickBooks Tool hub. If you still can’t make an Accountant’s Copy file, move on to the next solution.

You might not have security permissions.

Locate the QuickBooks company file and right-click on it. Choose the ‘Sharing and Security option and click on ‘Permission’. Now choose the ‘Add/Browse’ option and find the current user through which you are accessing the file.

Give all the read and write permissions to the user and then try creating an Accountant’s Copy again.

Conclusion – Contact QuickBooks Desktop Accounting Experts

If you are unable to create an Accountant’s Copy in QuickBooks due to this error, you should try reinstalling your QuickBooks Desktop. You can also take help from your accountant or get in touch with the QuickBooks desktop support team at +1888-727-4587.

QuickBooks Accountant Copy

QuickBooks Accountant Copy

What is Accountant Copy and How to Use It in QuickBooks Desktop?

If you manage your reckonings in QuickBooks Desktop by yourself. You are required to send the company file to your accountant for review. You will clearly use the QuickBooks Accountant Copy feature in QuickBooks Desktop.

QuickBooks Accountant Copy

It is a wondrous feature in QuickBooks desktop that allows you to create and send a copy of the company file to your Accountant without you having to stop your work while they check the files.

How Does the QuickBooks Accountant Copy Work?

You might frequently need to send QuickBooks company files to your accountant, and it is impractical to wait for them to send the files back. Instead, QuickBooks Accountant Copy can allow your accountant to make any changes while you continue working on the file, and then you can just merge the changes by importing the Accountant Copy.

How to Create Accountant Copy in QuickBooks Desktop?

QuickBooks offers two ways to create and send an Accountant’s Copy. You can either put it on a flash drive or upload it on a cloud drive. You can also use QuickBook’s built-in File Transfer Service.

To create a QuickBooks Accountant Copy,

  1. Open QuickBooks, click on File, and select Send Company File.
  2. Go to Accountant Copy, then Client Activities, and click on Save File.
  3. Then click Next and choose Accountant’s Copy.
  4. Click Next, choose the dividing date, then hit Next.

You will now get QuickBooks Desktop Accountant Copy in a .qbx file format. You can give it to your Accountant on a USB flash drive or send it over email or a cloud service like OneDrive, Dropbox, Google Drive, etc.

How to Send Accountant’s Copy via QuickBooks File Transfer Service?

  1. In the File menu, go to Send Company File.
  2. Select Accountant Copy and go for the option Client Activities.
  3. Click Send to Accountant and hit Next.
  4. Choose the dividing date and click ‘Next.
  5. Type your Accountant’s and your email address.
  6. Enter a password for the file and share it with your accountant.
  7. Click Send.

Once the file is sent, the Accountant’s Copy is available to download for two weeks before it gets deleted from the servers.

How to Import a QuickBooks Accountant Copy Change File?

Once your accountant has reviewed the Accountant’s Copy file and made changes to it, they can send it back to you in a change file format (.qby).

If they send it through the Web, you will get an email notifying you of the same and asking you to download the file within 30 days.

To import these changes directly into your QuickBooks file, you need to open the company file that you used to create the Accountant’s Copy.

Then follow these steps:

  1. Click File and choose Accountant Copy.
  2. Go to Client Activities and click on Import Accountant’s Changes from Web.

QuickBooks will download the file and open the change listing.

QuickBooks accountant copy file

If you already have the change file, you can select the Import Accountant’s Changes from File option in Client Activities to open it directly. Or, you can just double-click the .qby file to open it (make sure your original company file is open).

How to Incorporate Your QuickBooks Accountant Copy Changes?

After you have successfully opened the change file,

  1. Go through the changes made by your accountant and ensure that none of the changes made by your accountant conflict with your work. In case it does, you’ll get a message below the change with additional instructions.
  2. If you want to keep a record of the changes, you can save it as a PDF file or print it.
  3. Once you have reviewed the files and are satisfied with the changes, click on Incorporate Accountant’s Changes and hit OK. (If you don’t want to import the changes, just close the file.)
  4. A window will open up instructing you to Save a Backup Copy of your company file. Pick a folder for the backup and click OK. Close the window when the process is completed.

Note: During this process, the title bar will display a warning saying Accountant’s Changes Pending. Once you have incorporated the changes, this warning will go away.

Reach out to QuickBooks Desktop Experts & Get Help With Accountant Copy in QuickBooks Desktop

Using a QuickBooks Accountant’s Copy can save a lot of time and make it easy for you to collaborate with your accountant. In case you are unable to follow any of these instructions, ask your accountant for help or reach out to QuickBooks Desktop support experts at +1888-727-4587.

QuickBooks External Accountant User

QuickBooks Desktop 2023 has various features that keep it ahead of other accounting software. In the gamut of Features in QuickBooks Desktop, QuickBooks external accountant is a marvelous one. By using the QuickBooks desktop accountant feature QuickBooks allows accountants to access the company files. In this support article, you will learn how to add or set up QuickBooks external accountant users.

QuickBooks External accountant user

What is QuickBooks External Accountant?

When you set up an external accountant user in QuickBooks desktop. It allows the accountant to sign in to your QuickBooks and audit the company file. This feature also bypasses the login prompt for the accountant to access books easily. But also, stars out any personal information to avoid any type of loss.

Also, Read What is QuickBooks Accountant Copy

What does an external accountant user do in QuickBooks?

The accountant audits the balance sheet to ensure accurate financial management. Now, you get to verify your accountant’s audit as well by using the Audit Trail feature in QuickBooks.

How To Set Up QuickBooks External Accountant User?

Learn how to add or set up external accountant users on QuickBooks desktop. Here is how you can do it:-

Set up QuickBooks External Accountant user in QuickBooks Pro & QuickBooks Premier

QuickBooks External Accountant user in QuickBooks Pro QuickBooks Premier

  • Launch QuickBooks Desktop
  • Sign in to your company file
  • Choose Company
  • Click on Set Up Users & Password
  • Choose Set up Users
  • Click on Add User
  • Add login details like User Name & Password
  • Click on Next
  • Choose External Accountant
  • Click on Next
  • Choose Yes to allow access for new user
  • Click on Finish

Add or Set up QuickBooks External Accountant user in QuickBooks Enterprise

  • Launch QuickBooks Desktop Enterprise
  • Sign in to your company file
  • Click on the Company tab
  •  Choose Users
  • Click on Users & Roles
  • Type in login information & click on OK.
  • Click on New from the User List
  • Type User Login ID & any temporary password
  • Click on External Accountant Role from Available Roles
  • Click on Add
  • Type accountants or user’s email address
  • Click on OK
  • Click OK to confirm

Also, Check How to Send an Accountant’s Copy of QuickBooks

Ask Accountant to Accept The User Invite

After you get finished with these steps. You need to ask your accountant to accept the invitation sent in his email. Once the invite is approved and verified the accountant can easily look into your books & make necessary changes for you.

Contact QuickBooks Desktop Support

In case you need more guidance about adding or setting up users on the QuickBooks desktop. Get in touch with QuickBooks desktop support experts at +1888-727-4587. Learn more about a wide range of QuickBooks features by a certified QuickBooks desktop ProAdvisor at no cost.

More Support Articles About QuickBooks User Setup

  1. QuickBooks multi-user mode setup
  2. Quickbooks Point of Sale multi-user setup

Find a ProAdvisor | Find an Accountant | Intuit Certified QuickBooks ProAdvisor

QuickBooks ProAdvisors are Intuit-certified QuickBooks technicians or accountants who can provide QuickBooks training/Seminars, QuickBooks technical support, Bookkeeping services, tax return services, audits, and tax planning for a business, etc. They are elected by Intuit after clearing ProAdvisor exams that Intuit offers every two years.

QuickBooks has many versions according to the customer requirements so they have different ProAdvisor certifications for different versions such as Desktop, Online, Point of Sale, etc. You can find a Proadvisor from anywhere, I have mentioned the procedure below.

Find a proadvisor

How to Find A ProAdvisor

  • Go to the ProAdvisor search portal
  • In the location, tab add your location
  •  Filter your industry served
  • Choose the service that is required
  • Select the QuickBooks product that you are using

If you face any issues in finding a ProAdvisor, you can Call QuickBooks customer service phone number  for help.