Overview of Expenses in QuickBooks
Table of Contents
- 1 Overview of Expenses in QuickBooks
- 2 What is Expense in QuickBooks?
- 2.1 Step-by Instructions for how to Enter Expense in QuickBooks
- 2.2 Step 1: Open QuickBooks Expense
- 2.3 Step 2: Choose the Payee
- 2.4 Step 3: Choose an account
- 2.5 Step 4: Enter the transaction date
- 2.6 How do I record business expenses paid with personal funds in QuickBooks?
- 2.7 Conclusion – Expenses in QuickBooks
What is Expense in QuickBooks?
Expense is a crucial thing in QuickBooks. In the simplest words, the expense can be any transaction you made and want to enter in QuickBooks. And though the procedure may seem difficult to some users, it is an extremely sorted out way to deal with the transaction, and if you learn the right way to do this, you won’t miss a single transaction or entry in the QuickBooks Desktop Enterprise.
Here, in the article, we are going to talk about the correct procedure of how to enter expenses in QuickBooks and how you can manage the Owner’s account purchase in QuickBooks. Have a look at the steps discussed in the article, and add the details as per the needs and preferences.
Step-by Instructions for how to Enter Expense in QuickBooks
It is essential that you follow the right procedure to enter expenses in QuickBooks Online. This will not only avoid any hassle but will help you avoid the last-minute hurry. In case you are not aware of the procedure to record an expense, here is the step-to-step guide that can help you record it with ease.
Have a look at the procedure, and you are not going to face any issues regarding the recording of the expense.
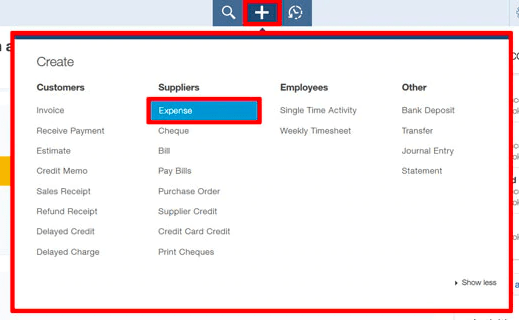
Step 1: Open QuickBooks Expense
Go to the Create menu and choose “Expense” under the Suppliers Section
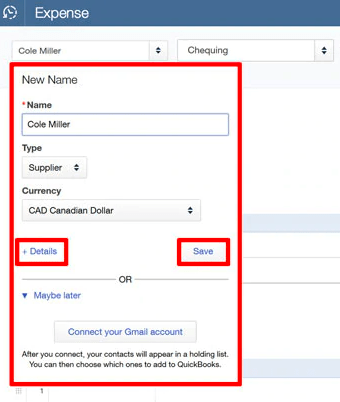
Step 2: Choose the Payee
Here you can forward it in two ways. One, you can add a new Payee and use the account, or in case you already have added the payee, you can select the account from the drop-down menu.
In this step, you can also add other details like the account details of the payment along with the item details.
You can add and remove the rows with ease and can skip adding the details if you want to just add the payee at the time.
Make sure to click on ”SAVE” to save the changes.
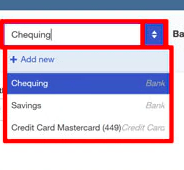
Step 3: Choose an account
Here, you can choose the account type where the amount has come from. This includes Cheque, Credit, and Debit cards, along with many others. So, this will help you make things more clear and will help you manage the transaction in a better way.
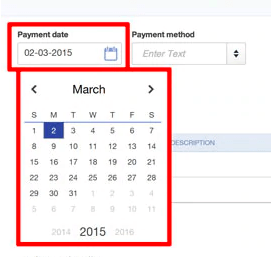
Step 4: Enter the transaction date
The expense utility has a calendar view where you can select the date when the purchase is made. Just click on the date and select the payment method to add a new expense entry. You can change the details of the expense as per the needs.
Step 5: Choose the category
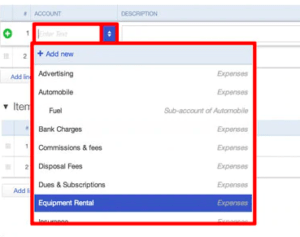
Now, select the category of the item/service you have paid for. You can easily find an appropriate category from the drop-down menu. Select it, and you are ready to add the entries. This is how to categorize expenses in QuickBooks.
Step 6: Add the item description as per the requirements
In this step, you can easily add all the product descriptions and details that you want to add to the system to make things more sorted and easily manageable.
Step 7: Add the amount for the purchase
Now once you have added the item on QuickBooks, it is time to add the value of the product. Apart from the amount of the product, you can easily add the applicable taxes for the product.
It is essential to enter the applicable taxes on the prescribed field so that you can easily see the tax amount on all your purchases.
Step 8:Saving and adding a new item
Click on “Save and New” if you want to save and add another item to the list. Alternatively, you can “Save and Close” to close the Expense Section.
How do I record business expenses paid with personal funds in QuickBooks?
Here is how to record business expenses paid with personal funds in QuickBooks. In case the owner has made expenses from his personal account and wants to show this on QuickBooks, then there are a few tweaks that can help show the Owner’s personal account separately in QuickBooks Expenses that would be extremely beneficial for reimbursements. So, here’s how you can show the expenses paid with the personal account.
To add personal funds’ expenses, you are going to do two additional steps. These steps will help you add the expenses and reimbursement of the amount. So, if you are looking to add the amount on QuickBooks, you should be aware of these steps and how to perform them properly.
Step 1: Select a new item
- Select +New
- Select Journal entry
- Select expense account for the purchase
- Enter the amount in the “Debits’ Column
- On the second line, opt for “Owner’s equity”, or “Partner’s Equity”
- Enter the same amount on the “Credits” filed
- Then select “Save and Close”
Step 2: Reimburse the money
Now the amount has been shown in the records, you can easily make the reimbursement. Here’s how you can do it.
- Select +New
- Select “Add expense”
- Now select or add the bank details in which you want the reimbursed amount
- In the category, select “Partner’s equity” or “Owner’s equity”
- Enter the amount for reimbursement.
- Select “Save and close”
By following these two steps, you can easily reimburse the amount you have used from your personal account. With the better handling and reimbursement of the amount, you can easily rely on QuickBooks and get the best money management possible.
Conclusion – Expenses in QuickBooks
In all, an Expense is one of the easiest and most reliable ways to enter the transaction and keep a record of them. The settings and usability of the utility make this a perfect feature of QuickBooks. In case you need help with QuickBooks, call QuickBooks 24/7 support experts on +1800-994-0980
And if you are into a business and want to use QuickBooks like a pro, you should know this procedure extremely well. It offers the users to add and edit the expenses in QuickBooks & also deals with the owner’s account reimbursement quite effectively.
So, whether you are looking to keep a good record of your expenses and earnings, or are looking for the best-in-class money management, QuickBooks can be extremely handy too for you to go with. Just make sure that you follow all the steps properly and can handle the errors, and QuickBooks can be a great program for your business.

