Welcome to our comprehensive guide on how to add, create, and manage users and their roles in QuickBooks Desktop Enterprise Solutions. Who is this guide for? If you are a QuickBooks desktop enterprise admin user and want to create and add users to your QuickBooks desktop with specific roles and permissions.
In this support guide, we will walk through the step-by-step process to efficiently create and manage users and their roles in QuickBooks desktop enterprise. We ensure that by using the steps mentioned below you will be able to successfully understand the user creation and management in QuickBooks desktop enterprise.
Add, Manage, and Define User Roles in QuickBooks Desktop Enterprise
Table of Contents
With modern innovations and technology, it has become a lot easier for businesses to efficiently manage and run their books. QuickBooks desktop enterprise has been awarded as the best accounting application for small businesses. With its advanced and intuitive features, it allows users to stay ahead of the game. QuickBooks Desktop Enterprise has a robust feature that allows admin users to create, define user and roles and permissions. This allows QuickBooks desktop users to maximize efficiency, and security and simplify the accounting process.
How to add a QuickBooks Desktop User
Add a QuickBooks desktop user using these steps:-
- Launch QuickBooks desktop as an administrator.
- Navigate to the company option on the top menu.
- Click on the user from the drop-down menu.
- Choose Setup User & Roles.
- Input the administrator password as prompted and click on OK.
- Click on the user list option.
- Select New user > Enter the user name and password (save it for later).
- In the available roles section, choose the roles or permission you want for the user click on add, and select OK.
Invite New users via Email to create an Intuit account
In QuickBooks desktop, you can also invite and add a user via email.
- Launch QuickBooks desktop as an administrator.
- Navigate to the company option on the top menu.
- Click on the user from the drop-down menu.
- Select the Intuit user account management option
- Click on Add a User from the User’s tab
- Input the email address define the roles and click on Add.
- Choose Add user and Ok.
- Ask the user to check their email and accept the invite
Use the new email ID and credentials for the QuickBooks user to log in next time.
User Roles
The User Roles feature in QuickBooks desktop is an amazing feature. By using the User roles feature the administrator can define what actions can a user perform on the QuickBooks desktop. User Roles are a set of permissions that allow user access control in QuickBooks desktop. You can ensure the permissions given to each user for their responsibilities by using this feature. It helps businesses to work in a better structure and simplify the accounting process.
Predefined Roles
QuickBooks desktop enterprise has 14 predefined roles which are common for all types of businesses. You can also customize a predefined role in QuickBooks desktop.
How to use predefined role in QuickBooks
- Launch QuickBooks desktop as an administrator.
- Navigate to the company option on the top menu.
- Click on the user from the drop-down menu.
- Choose Setup User & Roles.
- Enter the admin password.

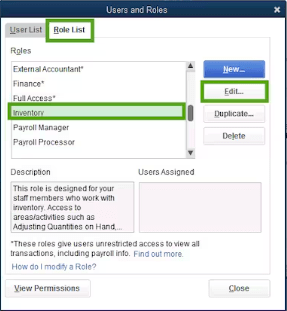
- Click on the role list tab.
- The * asterisk mark shows the users with unrestricted access to view transactions in the accounts.
- Choose a role and click on edit to review user permissions.

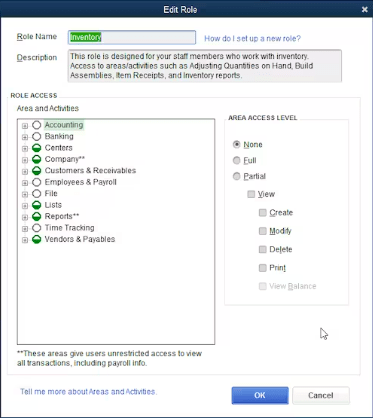
- After you click on edit role you will see Area and Activities option and Area Access Level option under Role Access.
- You can select the area of your account in the Activities tab.
- You can edit and set the access level in the Area Access tab.
- Click on Okay after you have set the user roles.
Create a New Custom Role
- Launch QuickBooks desktop as an administrator.
- Navigate to the company option on the top menu.
- Click on the user from the drop-down menu.
- Choose Setup User & Roles.
- Enter the admin password.
- Click on the role list tab and select New.
- Put name and description for the role.
- set roles permissions and access.
- Click on OK.
Review Roles & Permissions
- Launch QuickBooks desktop as an administrator.
- Navigate to the company option on the top menu.
- Click on the user from the drop-down menu.
- Choose Setup User & Roles.
- Enter the admin password.
- Click on the Role list option and choose View Permissions.
- You can review the roles and permissions by clicking on Display.
Delete A Role
- Launch QuickBooks desktop as an administrator.
- Navigate to the company option on the top menu.
- Click on the user from the drop-down menu.
- Choose Setup User & Roles.
- Click on the Role list option and click on Delete.
- Ensure you don’t have any users assigned to the role.
Contact QuickBooks Enterprise Support Team
In conclusion, the user must have understood the user role management in QuickBooks desktop enterprise by this support article. By using this guide you can easily tailor user permissions and roles in QuickBooks desktop. If in case you need expert assistance you can call our QuickBooks enterprise support phone number and get quick help from our experts.


