In todays fast pace of accounting management evolution in small to medium scale business, utilising every feature in QuickBooks Desktop is crucial for increasing efficiency of your business. One of the most important task, often overlooked is efficient list management. In this, support article, Learn how to sort or re-sort lists in QuickBooks desktop to gain insights quickly, have a more clear understanding of setting up QuickBooks chart of account and resolve list problems in QuickBooks.
With our years of expertise in providing QuickBooks desktop help insights, our comprehensive guide aims to elevate your understanding and execution of list sorting techniques in Quickbooks desktop versions like Pro, Premier & Enterprise. Discover how lists management in QuickBooks can get you more out of your software. Here is a detailed guide on how to sort or re-sort lists in QuickBooks desktop.
Why do you need to sort or re-sort lists in QuickBooks desktop
Table of Contents
When QuickBooks desktop users notice discrepancies and un-usual behaviour in their account names, information, Item list, or chart of account. In most cases where there is no error displayed. Users are recommended to re-sort lists in QuickBooks desktop to ensure that you are getting the right lists or accurate information during your work-flow in QuickBooks. To avoid any errors follow this guide to re-sort lists in QuickBooks.
Significance of Well-Organised Lists
Efficient list management is the backbone of QuickBooks Desktop efficiency. Well-organized lists, such as chart of accounts, customer lists, and vendor lists, empower users to navigate financial data seamlessly.
QuickBooks Default List Sort Settings vs. Customized Sort
QuickBooks Desktop offers default sorting options, but customizing lists can enhance accessibility. Our guide delves into the nuances of default sorting and the strategic advantages of tailoring lists to your specific business needs.
Lists Sorting in QuickBooks Desktop Explained
Alphabetical Sort Techniques
QuickBooks Default Alphabetical Sort Order
By default, QuickBooks desktop version arranges Lists alphabetically. Understanding the default order can aid users in efficiently navigating through a number of different types of lists in QuickBooks.
Custom Alphabetical Sorting
For more customised control, custom alphabetical sort method allows businesses to filter entries based on unique criteria. This section provides a step-by-step guide to implementing custom alphabetical sorting effectively in QuickBooks desktop.
Numerical Sorting Strategies
Default Numerical Sort Setting
QuickBooks desktop handles numerical data with default sorting options. We explore how QuickBooks processes numerical values in lists and provide insights into optimizing default numerical sorting to give a better view of your financial system.
Advanced Numerical Sorting in QuickBooks
Taking control of numerical sorting is essential for businesses dealing with complex financial data, especially users using QuickBooks desktop enterprise version.. Our guide demonstrates advanced numerical sorting techniques, offering a competitive edge in list management.
Date Sorting for Time-Sensitive Data
QuickBooks Default Date Sorting
Efficiently managing time-sensitive data is critical for financial accuracy in QuickBooks desktop. We break down the default date sorting options and guide users on leveraging this feature for optimal results.
Fine-Tuning Date Sorting
Customizing date sorting parameters enhances precision in QuickBooks desktop. Our QuickBooks technical support team explores the intricacies of fine-tuning date sorting to meet the specific needs of your business.
How to Re-sort Lists in QuickBooks For Windows
To narrow down the list management, follow the steps to re-sort lists in QuickBooks desktop for windows. Before trying any steps to sort or re-sort lists in QuickBooks desktop. Ensure you are in single user mode. Switch from QuickBooks desktop multi-user mode to single-user before performing the steps provided below.
Re-sort primary name list in QuickBooks
The Primary name list in QuickBooks desktop for windows is of your customers’ jobs, suppliers, employees, and other names. There are different methods to re-sort lists in QuickBooks desktop in order to fix the lists related problem.
- Launch QuickBooks desktop.

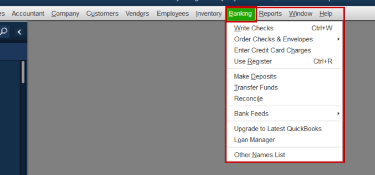
- In the top menu, Click on the Banking menu.
- Choose the Write Cheques option below.

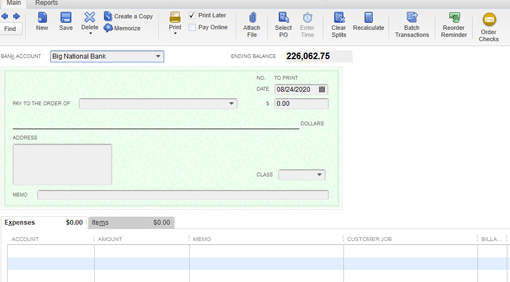
- In the Write cheques tab or window, Click on the Pay to the order of option.
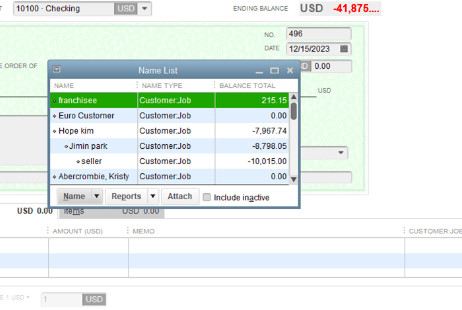
- Press Control and hold down L on your keyboard, a new tab will pop out with the name list.

- Click on the Include Inactive checkbox. If the inactive option is inaccessible or greyed out, you do not have any inactive names in your list.
- Click on the Account’s Name tab and tap of the symbol to re-order the list.

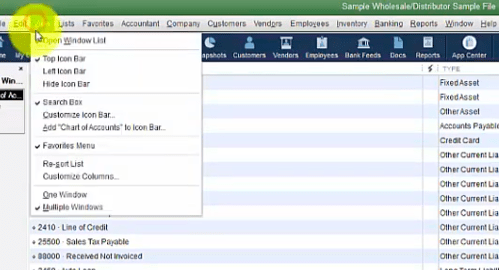
- Click on the View option on the top menu, navigate to Re-sort List option and click on it & select OK.
- Close and log out of your company file and exit QuickBooks desktop.
- Relaunch QuickBooks desktop to see for changes.
Re-sort lists in QuickBooks using find option
This method is useful for multi-user mode users in QuickBooks, where the user does not have access to banking permission. Remember to switch to single user mode in QuickBooks desktop before performing the steps to re-sort lists in QuickBooks.
- Launch QuickBooks desktop.
- On the top menu click on Edit, Click on Find.
- Choose the Advanced Tab option.
- In the new tab, from the filter list option, click on name.
- Click on the Name tab, to re-order the list.
- Press Control and hold down L on your keyboard, a new tab will pop out with the name list.
- Click on the Include Inactive checkbox. If the inactive option is inaccessible or greyed out, you do not have any inactive names in your list.
- Click on the Account’s Name tab and tap of the symbol to re-order the list.
- Click on the View option on the top menu, navigate to Re-sort List option and click on it & select OK.
- Close and log out of your company file and exit QuickBooks desktop.
- Relaunch QuickBooks desktop to see for changes.
Re-sort lists through general journal entry window in QuickBooks
- Launch QuickBooks desktop
- Click on the Company option on the top menu
- Choose Make general journal entries option from the dropdown.
- Choose the Name column, press and hold CTRL+L on your keys.
- Click on the Include Inactive checkbox. If the inactive option is inaccessible or greyed out, you do not have any inactive names in your list.
- Click on the Account’s Name tab and tap of the symbol to re-order the list.
- Click on the View option on the top menu, navigate to Re-sort List option and click on it & select OK.
- Close and log out of your company file and exit QuickBooks desktop.
- Relaunch QuickBooks desktop to see for changes.
Info : QuickBooks desktop for windows re-sorts list and Chart of accounts considering the first three digits numerically. Organise your list efficiently and add 1,2,3 for more clarity.
Contact QuickBooks Professional for Help
QuickBooks desktop users may encounter challenges when trying to custom sort or re-sort lists in QuickBooks. We address common issues and provide troubleshooting tips to ensure a seamless experience. From QuickBooks company file data discrepancies to unexpected changes, our QuickBooks desktop support experts are equipped with the latest tools to troubleshoot effectively & instantly. Contact our QuickBooks support phone number +1800-994-0980 and get help from professionals.
