QuickBooks Condense Data Utility – Streamline Company File Data
Table of Contents
- 1 QuickBooks Condense Data Utility – Streamline Company File Data
- 2 How to Use QuickBooks Condense Data Utility in QuickBooks Desktop
- 2.1 1. Look for the Transactions that Cannot be Condensed
- 2.2 2. Condense after the RUN is Complete
- 2.3 3. Preparing the Company File
- 2.4 4. Save the Comparison report
- 2.5 How to Condense your QuickBooks Desktop Company File?
- 2.6 Running the QuickBooks Condense Data Utility
- 2.7 Period Copy in QuickBooks Condense Data
- 2.8 Contact QuickBooks Desktop Experts to get help with QuickBooks Condense Data Utility
The QuickBooks Condense Data Utility is at times known as QuickBooks Condense Repair Tool also. It is mainly used to fix QuickBooks desktop Errors that arise because of file condensing. It is an important part of the QuickBooks software and lets the users delete an Audit Trail. File sizes can easily be sized down with the help of QuickBooks Condense Data Utility without causing any damage to the quality of the data present in the file. Basically, it streamlines the company data file.
The feature available in the latest version of the QuickBooks software i.e. QuickBooks 2023, and QuickBooks Desktop 2023 is quick and smooth to function. Unlike in the older versions where this feature removed the transaction details and created an amalgamated journal entry for data before date selection, the latest version leaves all the detailed transactions.
How to Start QuickBooks Condense Data Utility in QuickBooks
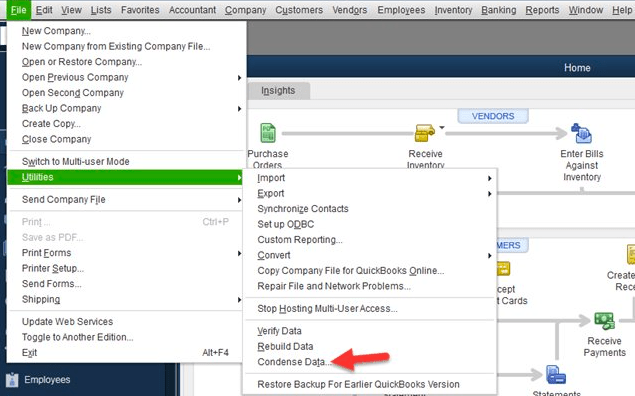
- Go to the File menu
- Tap on Utilities
- Click on the Condense data option
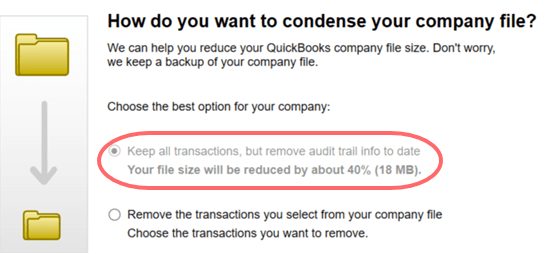
- Next, you will be prompted with the question “How do you want to condense your company file”? – you must select the first option which says “Keep all transactions but remove audit trail info to date. Your file size will be reduced by about 40% (18 MB).”
- Click Next and you will see a prompt that says “working on the file”
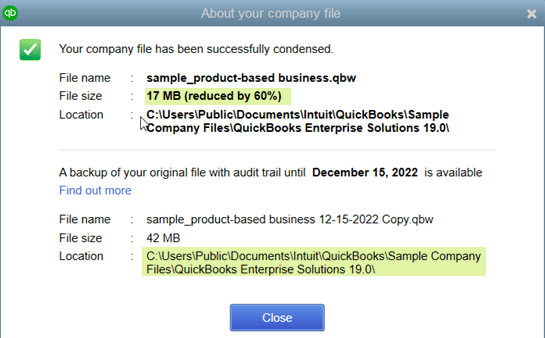
- Once this process ends, you will be able to see a prompt describing the before and after size of the files and the location of the backup
Easily Repair QuickBooks Condense Data Error 80004005
How to Use QuickBooks Condense Data Utility in QuickBooks Desktop
The QuickBooks Condense Data Utility offers many interesting features. This is a detailed step-by-step guide that the users can use to exploit all the features before they can begin condensing the company file.
1. Look for the Transactions that Cannot be Condensed
RUN reports and check the transactions that cannot be condensed.
2. Condense after the RUN is Complete
RUN the report and then proceed to condense the QuickBooks company file.
- Go to File
- Click on Utilities
- Next click on Condense Data
- A wizard tool will come up on the screen. You must select ‘Transactions before specific date’ and enter the dates accurately
- Click on Next and select the ‘Summarize Inventory Transactions’ option
- Next, select a method of condensing inventory
- Select the Transaction groups that you wish to remove
- Click on ‘Begin Condense’ to initiate the condensing process
3. Preparing the Company File
- First, you must delete the data file closing date
- Next, go to Edit and click on Preferences
- Select Accounting and then click on Company Preferences
- Mention the date in the closing date area
- Remove ‘Date’ from the Closing Date Box and click OK
- Run Profit & Loss and Balance Sheet to get an overview of the transactions. Once this is done run, rebuild, and verify the data utility files ensuring there is no damage to the data
- Copy the Company file and create a backup
4. Save the Comparison report
To avoid deletion of any information when the file is condensed, you must make a copy of all the important reports and save them in a PDF format. Some important documents that you must consider saving are:
- Cash Flow Statement
- Profit and Loss, Balance sheet
- Account payable and Account Receivables
- Any other books that are important and required by the accountant or user
How to Condense your QuickBooks Desktop Company File?
Running the QuickBooks Condense Data Utility
- Go to File Menu
- Click on Utilities
- Go to Condense Data
- Click on your choices to proceed with condensing the file
- Once the selection is done, initiate the process of condensing by clicking on Begin Condense
Period Copy in QuickBooks Condense Data
Period Copy – It is a condensed version of the company file comprising data for a specific period. This is available in the QuickBooks enterprise version or the premier accountant. Here is how you can get this file:
- Go to file
- Click on Utilities
- Next, Click on Condense data
- The option prompted “What transactions do you want to remove? The user must select the transactions outside a certain date range
- Correct dates must be input to remove the transactions before and after the filter
- You must go through the wizard prompted to select options according to your requirements.
- Finally, you can compare the before and after versions of condensed files
Contact QuickBooks Desktop Experts to get help with QuickBooks Condense Data Utility
Following the above steps will help you use the QuickBooks Condense Data Utility tool effectively. In case you need assistance with condensing the QuickBooks data file. Connect with our QuickBooks desktop enterprise support experts at +1800-994-0980.


